Posts

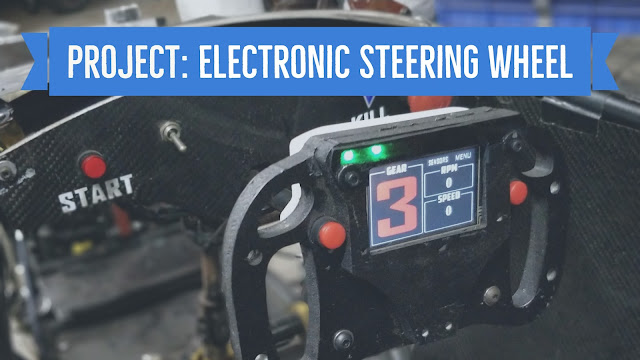
Project: Electronic Steering Wheel
Image
Hello everyone! In the blogpost below, I share one of my favourite projects, and that is the electronic steering wheel. I designed and developed the steering wheel for a formula student car. The function of the electronics on the wheel are to basically control several systems of the car like settings for radiator fan, drag reduction system and variable length intake manifold. To get a brief idea, first watch the video below and then continue with the post. The Setup The setup can be divided into 4 levels of hierarchy. Consider the diagram below: Arduino: The role of arduino in my setup is to receive input from the touch screen and gear shift buttons and accordingly deliver an output signal to control all the relays and servo. Steering wheel and actuators: Quick release electrical coupling: As far as the production of the steering wheel is concerned, this was undoubtedly the most difficult part of the entire setup. The male side of a round electrica...

Arduino 101: Tutorial #7 |Playing with LED|

Image
Hello people! In this tutorial we will try to make various patterns to blink a single LED. This is going to be fun :). So let's get started.! Suggested Reading If you aren't familiar with the following concepts, I recommend checking out these tutorials before continuing. Connecting an LED in a circuit   Working with breadboard Electrical Engineering Basics Making the circuit In this tutorial we're going to use the same circuit that we made in our previous tutorial here.  The circuit goes as follows: The only new thing that we're going to do today is to blink the LED differently by making slight changes to our code. Coding Until now, we've been executing all lines of our code. But what if we want to do something on a certain condition , and something else on some other condition. These kinds of situations as very common in coding and is an important part of programing. These situations are handled in programing by something known...

Arduino 101: Tutorial #6 |Important Concepts|

Image
Hello people! In this tutorial we will see some important concepts like comments in a code and discuss a few mistakes that beginners make while learning arduino. So let's get started.! Important Concepts Comments in a code: If you recall the very first code that we made. It was a fairly simple code to blink an LED. We defined only one variable (our pin number) and used a few commands that made our code to work. Now imagine a situation where you're working with tens of different led's performing different functions used at several different places in a code. You can see how difficult it will be to remember each one of the LED's and their functions in code. In this kind of situation, a code can easily become very messy. It will become very hard to read and understand, not for the computer(of course!) but for the human. Hence to make code more readable to human eyes, we use comments at various places to describe the working of block of codes. These commen...

Arduino 101: Tutorial #5 |Our First Circuit|

Image
Hello people! In this tutorial we will be making our first circuit with the arduino(Yayyy!). We will learn how to connect an external LED with the arduino and make it blink, just like we did in our first tutorial with the inbuilt LED. So let's get started.! Suggested Reading If you aren’t familiar with the following concepts, I recommend checking out these tutorials before continuing. Electrical Engineering Basics : Ohm's law, voltage, current, resistance. Working With Breadboards Theory Diode: A diode is a component that allows current to flow only in one direction. Hence, in electric circuits, a diode can be thought of as a one way check valve, that permits the flow of current only in one direction. There are other types of diodes too, performing different functions, but these are the ones that we'll be using most commonly in our arduino circuits. LED: LED stands for light emitting diode. The two terminals of an LED are called anode and cathode. T...

Arduino 101: Tutorial #4 |Working with Breadboard|

Image
Hello everyone! In this tutorial, we will learn what a breadboard is and how it is used to make electronic circuits. So let's get started.! Breadboard A breadboard, also known as a prototyping board, is used as a construction base for electronic circuits. It is usually used to make quick prototypes and circuits, hence the name prototyping board.Probably the best thing about breadboards is that it is reusable. You can simply disassemble the circuit on your breadboard, and make a new one very quickly.  Working  Breadboard is all about connected holes in a certain configuration. Simply speaking, all the holes joined with a line are electrically connected to each other( Consider the image below).Electrically, this means that all the holes of a line are at the same electric potential. Construction Any breadboard can be divided into 4 grids. Here I name these individual grids as A,B,C and D . All the holes in each grid are in someway electrically connecte...

Arduino 101: Tutorial #3 |Analog and Digital Signals|

Image
Hello everyone! In this tutorial we will try to understand the true meaning of analog and digital signals. I will try to explain it in the simplest way possible without using any fancy terms. So let's get started.! Consider an example Let us try to understand analog and digital signals using an example. Suppose one day you go out to play football with your friends in a nearby park. After an hour of playing, you realize that you're thirsty and need to drink water. So you go to your home, fill a big glass of water and start drinking from it. After finishing three quarters of a glass you realize that you're full and can't drink any more water. So you decide to throw the remaining quarter of water of glass in the sink, and go out to play again.  In this case you had the choice on how much water you want to drink. You chose to drink three quarters of a glass.  As a matter of fact, there are almost infinite number of possibilities in which you can drink ...

Arduino 101: Tutorial #2 |Electrical Engineering Basics|

Image
Hello everyone! Welcome to the second tutorial of this series. In last tutorial we briefly introduced arduino, its applications and wrote a basic code to blink an LED. In this tutorial we're going to briefly go over some basic electrical engineering concepts that we may use while working with the arduino. This includes understanding voltage, current, resistance, potentiometers etc. that will help you make your own arduino circuits. So let's get started! First off, we need to gobble up some basic definitions. Basic Definitions Electric Current An electric current is a flow of electric charge. In electric circuits this charge is often carried by moving electrons in a wire . It can also be carried by ions in an electrolyte , or by both ions and electrons in some special cases. Voltage In simple terms, it is the difference in electric potential energy between two points per unit electric charge. Resistance The electrical resistance of an electrical conductor is a...

Arduino 101: Tutorial #1 |Introduction|

Image
What is an Arduino? Arduino is an open source platform, a microcontroller and software. It is designed to make electronics more accessible to students, designers, hobbyists or anyone interested in creating interactive objects or environments.If you're a beginner and have never used a microcontroller, or for that matter any other associated electronics, arduino provides an easy to use, user friendly platform to start your journey. What can Arduino do? The Arduino microcontroller has a nearly limitless array of innovative applications for everything from robotics and lighting to games and gardening! It's a fun way to automate everything, enabling you to control simple devices or manage complex home automation systems.From merely blinking an led to start using a touch screen, arduino is capable of handling all levels of difficulties maintaining the user-friendly environment. The biggest strength of Arduino certainly has to be the open community. You can find thou...

Tutorial: Simple way to develop software for your hobby projects

Image
Hello People! As a mechanical engineer myself, I always wondered what it takes to develop a software. What kind of coding-mantra do these software engineers know that we people can't understand? How much in-depth knowledge is required about the computers before we can begin to see beautiful software's come to life on our own laptop. How difficult it actually is? Well, as it turns out to be, not difficult at all! In this tutorial I will share how you can make simple yet elegant software for your hobby-projects without spending hours and hours of research online. The only prerequisite is a very basic understanding of computer coding. To put this in prospective,  if you just know what a "for loop" is, you'll be able to complete this tutorial. So lets get started..! DISCLAIMER: The aim of this tutorial is to teach making basic-functional software for hobby-projects. This tutorial  in no way is a replacement for a professionally developed softwar...

Project: FSAE Variable length Intake Manifold(VLIM)

Image
What is an Intake manifold? An intake manifold is simply a mechanical component attached to the engines cylinder head that allows the air/fuel mixture to enter the combustion chamber of the engine. The intake manifold consists of following parts: What is Variable geometry intake manifold? A variable geometry intake manifold, as the name suggests, is an intake manifold that changes its geometry. The change in geometry is required to optimize the engines performance at different RPM. This is usually achieved by varying the runner length of the intake manifold. What are the benefits of a Variable geometry intake manifold ? Short answer, to achieve greater Volumetric efficiency. As a consequence of greater volumetric efficiency, we can achieve greater torque, power and thermal efficiency from the same size of the engine at the same RPM. What is Volumetric efficiency? Volumetric efficiency  in an  internal combustion engine,  is defined as ...